Upper Receiver Mods
If you are confused about what a part is called, click here .
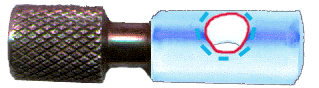
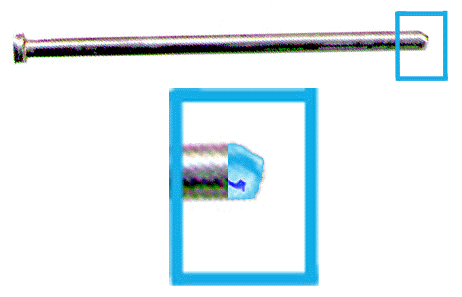
Silenced Cocking Knob Mod -
Go Home
What it does: Reduces some gun rattle and helps reduce the
clicking noise that occurs when you cock the gun back.
Materials:
-500 and 2000 grit sandpaper (doesn't have to be exact grit)
-Metal Polish (not required)(I use Mothers Mag & Aluminum Polish)
-Polishing Bit for drill/dremel, or terri cloth (not required)
-Masking tape
-Razor knife
1. Start by removing your cocking knob from the rear bolt.
2. Take the 500 grit sandpaper and round out the red (see image) edges on both
sides. Finish it up with the 2000 grit paper.
3. This step is optional. Get your metal polish and polishing bits/cloths, and
polish where you just sanded.
4. Take some masking tape and make a single revolution around the blue (see image)
end of the knob.
5. With a razor knife, lightly cut along the blue dotted line on both sides (see
image) and remove the tape circles.
6. Insert back into gun.
Silenced Rear Bolt Mod - Go Home
What it does: Makes less noise when the rear bolt hits the
valve pin.
Materials:
-Strongest glue you can find (I used some Gorilla Glue)
-Some kind of thin rubbery type material (I used part of a bike tire patch kit,
neoprene works too)
-A ruler
-Scissors
-Razor knife
-Pen
-Compass
-Rubbing alcohol
-Cotton swab
1. Take the rear bolt out of the gun.
2. Get the thin rubbery material and trace out a 5/8" circle on it with the
pen. In the center of that 5/8" circle, make a 3/16" circle.
3. Cut out the 5/8" circle, and then use a razor knife to cut the 3/16"
circle in the center out.
4. Get the rubbing alcohol and apply some to the cotton swab. Clean off the front
of the bolt (the end that hits the valve pin.)
5. Apply a medial amout of glue to the circle of material and apply it to your
front bolt (center it up nicely.)
6. Now let it dry. Sit it rubber part down on a table and wait the amount of time
the glue says. If the rubber circle falls off, use another type of glue.
7. Insert bolt into gun.

Silenced Drive Spring Mod - Go Home
What it does: This mod smoothens the outside of the drive
spring, which helps reduce that clicking noise that ocurs when cocking the gun
back.
Materials:
-2000 grit sandpaper (doesn't have to be exact grit)
-Metal Polish (not required)(I use Mothers Mag & Aluminum Polish)
-Polishing Bit for drill/dremel, or terri cloth (not required)
1. Take the drive spring out of the gun.
2. Get the sandpaper and work over the spring evenly.
3. This step is optional. Get your metal polish and polishing bits/cloths, and
polish where you just sanded.
4. Be sure to wipe away all residue and oil the spring properly.
5. Insert spring back into gun.

Low Profile Velocity Screw Mod - Go Home
What it does: If you have an Airtipps RVA, you need to unscrew
your velocity screw until it is no longer visible in the power tube. But do you
want the screw unscrewed that much? This mod explains how to cut the screw down
to size.
Materials:
-Hacksaw or Dremel with cutoff wheel
-Rough sandpaper or a dremel with a smooth grinding bit
-Masking tape
-Blue Loctite (#242)
1. Screw the velocity screw into the gun, so that it is in as far as you want
it to be.
2. Take the barrel off and look down into the power tube.
3. Count how many winds on the screw are visible.
4. Take the velocity screw out count down the amount of winds that you counted
in Step # 3. Make a line using some masking tape.
5. Get the saw or dremel and proceed to cut the screw at the line.
6. Round out the cut edges of the screw with the dremel grinding bit or sandpaper.
7. Put a drop of blue loctite about 1 mm or so down the screw (see image.)
8. You can now insert the screw into the gun.
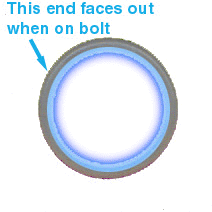
Low Profile Front Bolt O-Ring Mod - Go Home
What it does: If you have a barrel where the front bolt tends to
get stuck in the end of barrel, this mod can prevent it.
Materials:
-Razor knife
1. Take the o-ring of of the front bolt.
2. Lay it on a surface that you can get knicked up (block of wood.)
3. Get the razor knife and cut away the inside (blue on image) area of the o-ring.
4. Be very careful not to cut the o-ring in half.
5. When finished oil the o-ring and put it on the bolt, non-cutside facing out.
Ammo Box Lock Mod - Go Home
What it does: Prevents your hopper from getting eaten up
by the ammo box lock.
Materials:
-Ruler
-Access to some washers (hardware store)
1. Remove the pinch bolt and nut, then take out the ammo box lock.
A. You can stop right here and put the pinch bolt and nut back into
the gun.
B. You can continue to Step #2 if you wish.
2. Find a washer with the same specs as below and insert it where the ammo box
lock went. You may have to find a washer with the same size inner hole and grind
the outside to side.
3. Put the pinch bolt and nut back into the gun , the washer will replace the
ammo box lock.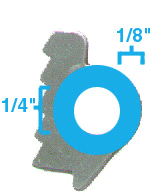
Silenced Drive Spring Guide Pin Mod - Go Home
What it does: Reduces some gun rattle and helps reduce the
clicking noise that occurs when you cock the gun back.
Materials:
-500 and 2000 grit sandpaper (doesn't have to be exact grit)
-Metal Polish (not required)(I use Mothers Mag &AluminumPolish)
-Polishing Bit for drill/dremel, or terri cloth (not required)
1. Take the 500 grit sandpaper and round out the (blue on image) edges on both
sides. Finish it up with the 2000 grit sandpaper.
2. This step is optional. Get your metal polish and polishing bits/cloths, and
polish where you just sanded. Be sure it is rounded out like in the image.
Stainless Steel Screws For The Foregrip Mod - Go
Home
What it does: So you have an Airtipps SS Screw kit? Bet
you'd like some SS screws for your foregrip.
Materials:
-Four 5/8" #4 Stainless Steel Screws
-One 1½" #6 Stainless Steel Screw
Note: You will probably have to go to a big name hardware store to get
these screws. I got mine from Lowes. Also, be sure to get a few extras. If you
cannot find them at a hardware store, try Small
Parts.
1. Remove all of the screws from the foregrip.
2. Replace them with the SS screws.
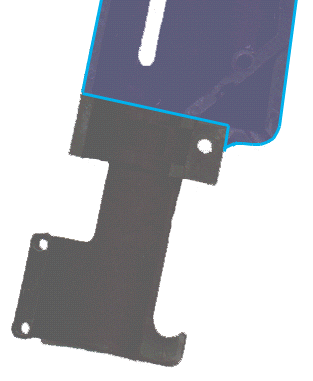
Combat Feed
What it does: Gets rid of the foregrip.
Materials:
-Two 5/8" #4 Screws
-One 3/4" #6 Screw
-Forearm Grip
-Hacksaw
-120 grit sandpaper
-1000 grit sandpaper
-Drill
-15/64" Drill Bit
-One Hopper Pinch Bolt
1. Take the foregrip apart and take out the Grip Latch, Grip Latch Spring, and
Grip Latch Roll Pin.
2. Using the hacksaw, cut off the blue sections on each side (see picture).
3. Reassemble the two halves using the screws. The 3/4" #6 screw goes where
the Grip Latch Roll Pin used to be.
4. Clean up any edges with the 120 grit sandpaper, then finish it off with the
1000 grit to give it a nice look.
5. Now put the feeder on your gun. Find a sharp object, stick it through the hole
that the pinch bolt goes into, and mark the center of the hole.
6. Take the drill and 15/64" bit and drill a 1/8" deep hole exactly
on the mark you made. This hole must be drilled precisely or lese it wont set
right on your gun.
7. Take the new Hopper Pinch Bolt, and cut it to a length of 1", then screw
it into the hole where the Barrel Pinch Bolt goes. This should keep the feeder
stable.
By: Matt
PCOG Member #149
Email: matts@antisocial.com
Copyright Matt Szabaga 2000-2001.