If you are confused
about what a part is called, click here .
Shortened Trigger Pull Mod - Go Home
What it does: Shortens the overall travel of your trigger.
Materials:
-Electrical tape (or thin plastic, be creative, I used part of a straw)
-Scissors
-The equipment to take the trigger frame apart.
Note: This mod is VERY hard to do if you have an APP double trigger frame (like
me.) I also do not suggest using electrical tape. This is because it can gum up
the insides of the gun after time.
1. Disassemble the frame. Take the trigger out.
2. Cut a piece of electrical tape, or thin material, 3/16" wide. The length
should be enough for the material to wrap inside the hole in the trigger 1½ times
(see picture.)
3. Put the loop of material into the hole.
4. Reassemble the frame and attach to gun. Cock back gun and shoot to make sure
it fires.
A. If it does fire, you have the option of making another loop, with
slightly more material.
EX: 1¾ rotations instead of 1½. Or you can just leave
it how it is.
B. If it does not fire, make another loop with less material.
EX: 1¼ rotations instead of 1½.
5. Get as much material as you can into the hole. More material equals less pull.

Reduced Trigger Play Mod - Go Home
What it does: What is trigger play? It is when your trigger wobbles from
side-to-side. This mod reduces that side-to-side wobble.
Materials:
-Thin plastic (like from an overhead transparency, I used some film)
-Drill with 1/8" bit (can be substituted with some thing that can poke a
1/8" hole in plastic)
-Scissors
-The equipment to take the trigger frame apart.
Note: This mod is even harder if you have an APP double trigger frame.
1. Disassemble the trigger frame.
2. Take thin plastic and drill or poke 4, 1/8" holes in it.
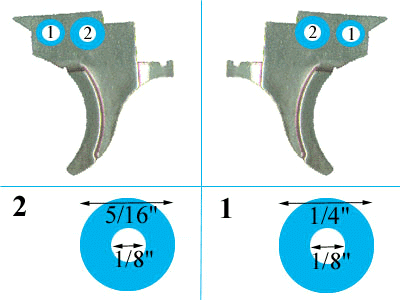
3. Around the 1/8" holes, cut out 2, 5/16" circles (see #2 on picture),and
2, 1/4" circles (see #1 on picture). Note:
Sizes don't have to be too exact, just get them close.
4. Put the two, #1's and #2's in their proper place, on either side of the picture.
Just put them over the pins.
5. Reassemble frame.
A. If trigger still wobbles, try using thicker plastic spacers.
B. If trigger is too tight, use thinner plastic spacers.
Lightened Trigger Pull Mod - Go Home
What it does: Lightens the overall resistance of the trigger.
1. Call up Tippmann and purchase a SL68-II Trigger Spring. This will reduce
your trigger pull to around 3 pounds.
2. Instead of buying a
SL68-II spring, or stretching the original spring, and getting a slightly lighter
trigger pull. I searched for some way to get a very light trigger pull. I went
to a large chain hardware store, like Lowes or Home Depot, and bought a general
purpose spring kit ($5-$10). After a couple minutes of scrounging through the
large box of springs, I found one that was perfect for the needs of my paintball
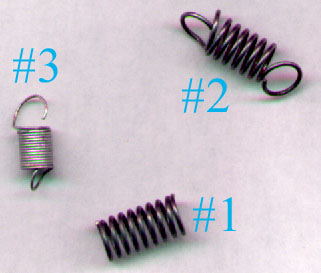
gun. It had a light pull and a really nice recoil (see #3 on picture). I just
installed it as you would a regular trigger spring.
If you found a perfect spring, but it has no loops at the end (see #1 on picture).
Simply bend them out (see #2 on picture).
Adjustable Trigger Stop Mod - Go Home
What it does: What is a trigger stop? A trigger stop is really only useful
on the P/C if you have a double trigger. Most of the time, especially after doing
my trigger mods, it is not required that you pull your trigger back to its full
extent to make the gun fire. It is to your advantage to get rid of this extra
pull. I was able to take 5/16"off my trigger pull, taking it down to 4/16"
(from 9/16".) If measured from the center of the double trigger (a standard
trigger), the pull was only 1/8".
Materials:
-Several steel (stainless is better) machine screws (I used screws with the same
threads as are used in the bottom line and to hold the grip frame on.) I would
suggest a screw whose head can accept an allen key to make it easy on you. Also,
the screw MUST be at lest the width of the Tippmann screws, maybe bigger. The
screw should be about 1½" long (you can always cut it to size.)
-A drill
-A drill bit slightly smaller than the screw you will be using (Bit #1)(I used
a 5/32" bit).
-A drill bit small enough to drill inside of the end of the screw (Bit #2)(I used
a 3/32" bit, it just fit inside the screw).
-Screw tap kit (if you dont have one I will show you a shortcut)
-Blue Loctite (not necessary)
-Something the same size as the knockouts on the APP frame. You will have to remove
the trigger for this mod.
-Tippmann's allen keys
-Something rubbery to put at the end of the screw. The trigger will be hitting
this alot, its gotta be durable (I used part of a button from an old remote control.)
-A file, or a dremel with a cutoff wheel.
Note: This mod is explained using the APP trigger frame. You can do it using the
stock frame, but some of the steps may be a little different. This mod is also
very hard. Do not attempt if you are not good with your hands.
1. Take the trigger and grips off of the frame.
2. Find the correct angle so as the hole you are going to drill will not hit the
trigger spring. Using a ruler, pencil a line on your frame (Line #1).
3. With the skinny part of the frame facing toward you (trigger side), find the
vertical center of the grip and draw a line down it. Then draw a line straight
across the front from the line you drew in Step #2. It should mark a nice place
to start drilling your hole when you are done. Be careful not to accidentally
wipe the pencil marks off.
4. Ok, now comes the fun part. Get Bit #1 and insert it into your drill. You are
going to have to do your best to keep the hole straight and along the line you
want. Drill slowly and cautiously.
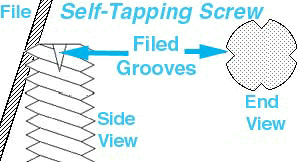
5. Now tap the hole you just made to fit the type of machine screw you have. If
you do not have a screw tap kit, see the Self-Tapping Screw image.You can tap
it from the front of the grip frame to make it easy on yourself. This is, by far,
the hardest part of the mod.
6. Take your other screw (if you did the self-tapping screw) and get Bit #2. Drill
a hole vertically in the screw on the end opposite of the screw head. It should
be around ¼" deep.
7. You can now take your screw and start threading it from the back ofthe frame
to the front, as in the image.
8. Once the screw is through, you can make a trigger detent (as I call it.) It
needs to be a soft material (rubber.) The top should be disc-shaped with a stem
coming down from the middle. You can make it from two pieces,or make out of one
solid piece. Once it is finished glue the detent in and let it dry.
9. Insert the trigger back onto the gun.
10. This step is optional. I did not do this, but you could. Draw a line (Line
#2) that continues along as Line #1 did. Drill a hole. The hole should be just
large enough to fit the allen key you are going to use to adjust the trigger stop
inside. This hole would make it easier to adjust the trigger stop, but I just
use the 90° allen wrench to adjust the screw.

To use this mod simply adjust the screw so that it goes out the maximum distance
allowable while still letting the gun shoot.
Customized APP Trigger & Guard Mod
What it does: This
mod will turn your ugly goldish colored trigger and guard into some nice chrome
looking pieces. This will work with the stock trigger too. I will also explain
how to bend the guard to fit better with DYE Sticky Grips, this also makes the
guard look much cooler.
Materials:
-Rough and smooth grit sandpaper (120, 500, 1000, 2000 grit paper is what I used)
-Mothers Mag & Aluminum Polish
-Terri cloth/rags
-Polishing bit for dremel/drill (not necessary)
-Hammer or rubber mallet
-Ruler
-Protractor (not necessary, but useful)
1. Take the trigger & guard off the APP frame.
2. Take the guard and sand it with the rough paper until there is no gold color
left.
3. Now go over the frame with the smooth paper. I stepped to 500, then 1000, then
2000. The smaller the grit, the better it will look.
4. Get the Mothers Polish and apply some to the piece. With your cloth or polishing
pit, go over the piece until it has a mirrory shine.
5. For the APP or stock trigger, all you need to get the piece shining is the
Mothers Polish. If you do not have a polishing bit, you may need to go over the
piece with 2000 grit sandpaper first. With your cloth or polishing pit, go over
the piece until it has a mirrory shine.
6. If you do not want to bend the guard, you are done. Otherwise, take you rubber
mallet/hammer and bend the frame to the specs in the picture. If you use a hammer,
put a piece of cloth over the guard when you hit it. I shaped my guard on a block
of wood.

Double Trigger Guard For Stock Frame
What it does: This
mod will put a tournament legal trigger guard on your stock trigger frame. You
can get a double trigger from Airtipps
(call them), APP,
and County Paintball.
Materials:
-Double Trigger
-File or Dremel with cutoff wheel
-Hammer or rubber mallet
-Ruler
-Protractor (not necessary, but useful)
-Pencil
-Fine grit sandpaper (I used 500 grit)
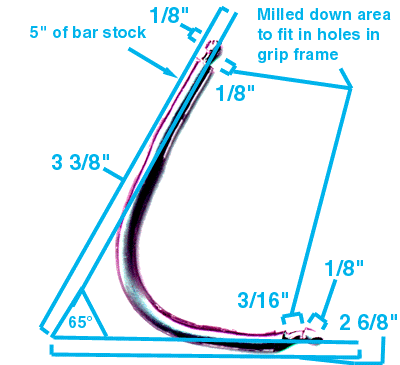
-5" piece of bar stock (I used 3/16" stock)
-Drill & drill bit (bit will be specified later)
-Hacksaw
1. Remove the trigger frame internals, then re-assemble.
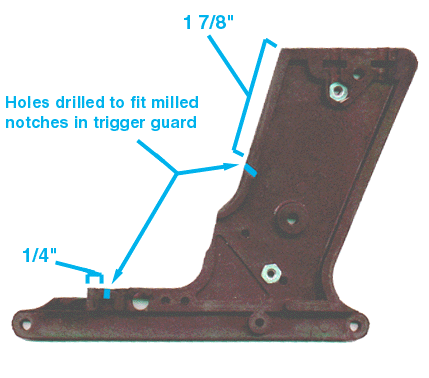
2. With a hacksaw, saw off the trigger frame (see picture #2).
3. Take the fine grit sandpaper and smoothen out the cut edges on the trigger
frame.
4. Measure on the frame and mark where the holes will be drilled (see picture
#2).
5. Take the bar stock, and bend it as close to the angle shown as possible.
You can always make it perfect later.
6. Take your bar stock, and 1/8" down from each end, take your file or
Dremel and mill it to the specs shown. How far down you mill the notches depends
on how large your bar stock is. Do not make the notches so big that the bar
might break at the notches (see picture #1).
7. With your ruler, measure how big the diameter of each notch is. You will
need this info when drilling the holes for the notches.
8. Now that you have the measure of each notch, you will need to find the best
drill bit to make a hole in the trigger frame. You can always just hold the
bits up to the notches and see which will work best.
9. With your selected bit/bits, drill holes in the proper spots in the trigger
frame. Be sure that your trigger frame is assembled when drilling (see picture
#2).
10. Disassemble your trigger frame and see how the guard will fit. Bend it so
it fits nicely.
11. Now put your guard into the frame and assemble it. It will likely wobble
a little. You can eliminate this wobble by putting some electrical tape on the
notches.
General Note:
Now that your gun shoots faster, you need to make it operate smoother to keep
up with the rate of fire. Do this by polishing the internals
of the gun.
By: Matt
PCOG Member #149
Email: matts@antisocial.com
Copyright Matt Szabaga 2000-2001.